

Caring for Your Plants
This should just take a few minutes every spring.
MULCH
Renew your mulch when the ground has thawed completely. Keep weeds and grass from underneath your plant.
WEEDING
Always hand weed. Otherwise you could seriously damage the root system as the fine root hairs are near the surface.
DEAD-HEADING
If you have time, remove the dead blooms as soon as they wilt to reduce seed production. The whole flowering stem can be snapped off being very careful not to break off the expanding leaf buds on either side (see Fig. #3). This will help your young plant bloom better as energy can be redirected to bud production rather than seed formation.
WATERING
During dry spells your plant will need a 1.5-2 hour sprinkling once every week to 10 days. It can be very dry near houses and under trees and roof overhangs in the summer. Check periodically. Discontinue watering by mid to late September. If the fall is particularly dry a good soaking before freeze-up is recommended.
PRUNING
Any dead branches should be removed as close to live wood as possible.
Small leaf varieties and evergreen azaleas can be pruned just after bloom and can be expected to re-sprout profusely if in sufficient sunlight. This is rarely necessary.
Deciduous azaleas hybrids should be pruned on a regular basis when they get old and bloom less profusely. Remove a third of the old stems to the ground level every year for 3 years to induce vigour.
Large leaf hybrids can be pruned in several ways. Dormant central leaf buds which are – slender and pointed like the tip of a pencil, as opposed to flower buds which are large & round (see Fig. #3), can be removed from terminal shoots in late summer to induce branching. Shoots with flower buds will self-prune. Alternatively, last year’s shoot can be removed to about 1 inch above last year’s whorl of leaves (See Figure #4). This is a more drastic measure; next year’s bloom is forfeited, but branching is more assured. Wayward branches can be removed at any time being sure to leave no stubs.
TRANSPLANTING/MOVING RHODOS (information provided by our member Stephen Archibald)
Rhodos are one of the easiest and most forgiving shrubs to move. That said, if your plant is very large the size alone will make it a challenging job.
Rhodos are shallow rooted and the roots form a mat at the surface. When I move a rhodo I get down on my hands and knees with a hand tool and start digging around the plant at its drip line. The edge of the root system is obvious and I start undercutting the root mat.
Once I’ve worked around the circumference and undercut as much as possible I start to pry the plant up. We use shovels and 2 by 4s but our favourite tool is a long steel crowbar. We also have blocks of 6 by 6 to use as handy fulcrums. Smaller plants pop out easily. Bigger and older plants take more work. An old plant may have produced a long tap root that goes straight down – long roots will have to be cut.
Once the plant is free we rock it onto a piece of plywood or a tarp or heavy plastic sheeting, which makes it easier to drag it to the new location (where a new shallow hole the size of the root ball has already been dug). We position the plant while it is still on the tarp to make sure the best side is where we want it.
Remove the tarp and start filling in the hole with good organic soil. We make sure that soil is worked under the edge of the root ball and that it is well watered. It will be important to water the plant well throughout the summer as the plant tries to recover. Mulching the plant well will help.
Most rhodos do not like to be planted in wet areas so good drainage is important. It is better to plant high than to have a hole that could hold water.
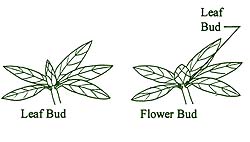
Figure 3 Leaf vs Flower Bud
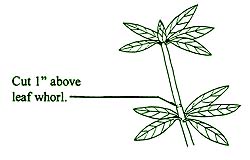
Figure 4 Pruning
